Dromaius: playing with PETs
This post is the third part in the series talking about Dromaius, my retro computer emulator. This time we’ll talk about getting the PET emulation somewhat up and running.
Other parts in this series:
- Part 1: I accidentally wrote a 6502 emulator.
- Part 2: Growing the 6502 emulator.
- Part 4: Dromaius: the simulator core.
Cobbling together a PET
We already have a 6502 CPU, the 6520 I/O-chip, and RAM/ROM-abstractions. What more do we need to get a working PET? Well, that depends on the definition of ‘working’. It turns out that if you’re willing to make some compromises, you don’t need a lot more. The goal is to get to the basic prompt and maybe run some simple commands. It would be nice to have the 6522 Versatile Interface Adapter, and a keyboard would also come in handy. A display - and subsequently all the display logic - is not necessary if you’re willing to just look at the raw values in the video-RAM. The IEEE-448 bus or the cassette port aren’t necessary to boot the machine.
The first task to tackle is the 6522 emulation. The process is pretty much the same as earlier. Read the data sheet, implement a small part, test it, read the data sheet again, apply some changes, eat, sleep, repeat. The most time-consuming part of implementing the keyboard was constructing the user interface. A “PET screen” mode was added to the memory panels to make it easier to interpret video RAM.
Believe it or not, the hardest part was figuring out which ROM versions to download for this PET model, and figuring out which editor ROM goes with what kernal version. Especially because some versions of the ROMs aren’t exactly stable and bugfree. But I got it up and running after a while, the result is shown in the next image.
The PET boots, starts running Basic, and accepts commands. Trying to access a floppy disk or the cassette hangs the machine. Even asserting the reset-line locks up the machine. Small victory, but I still danced around my home office (although I will never admit this publicly).
Motivated by this success, I decided to add an HLE display and to optimize the emulator to get it running the PET at full speed.
Diagnosing a sick PET
Troubleshooting the PET-emulator proved to be difficult and time-consuming. Breakpoints can be set on the program counter and the IRQ-line, but efficiently sussing out the source of any issues required better tools. A visual representation of the current state of the signals would be a great help in figuring out which part was to blame for a particular malfunction.
Integrating a fully functional schematic diagram viewer into the OpenGL-based Dromaius front-end, would be awesome. But also very time-consuming. With Dromaius still at the proof-of-concept phase, I wasn’t willing to invest so much time into this. Web browsers, on the other hand, are pretty good at displaying vector graphics (SVG) and Dromaius already compiles to WebAssembly using Emscripten. Again, a no-brainer.
And so the aptly named ‘htmlview’ was born. Redrawing the PET schematics in Inkskape took some time, but it was time well spent. Using htmlview as a debugging aid, piece after piece of the PET logic got implemented. Along the way, bugs in the 6502 and the I/O chips surfaced and were fixed.
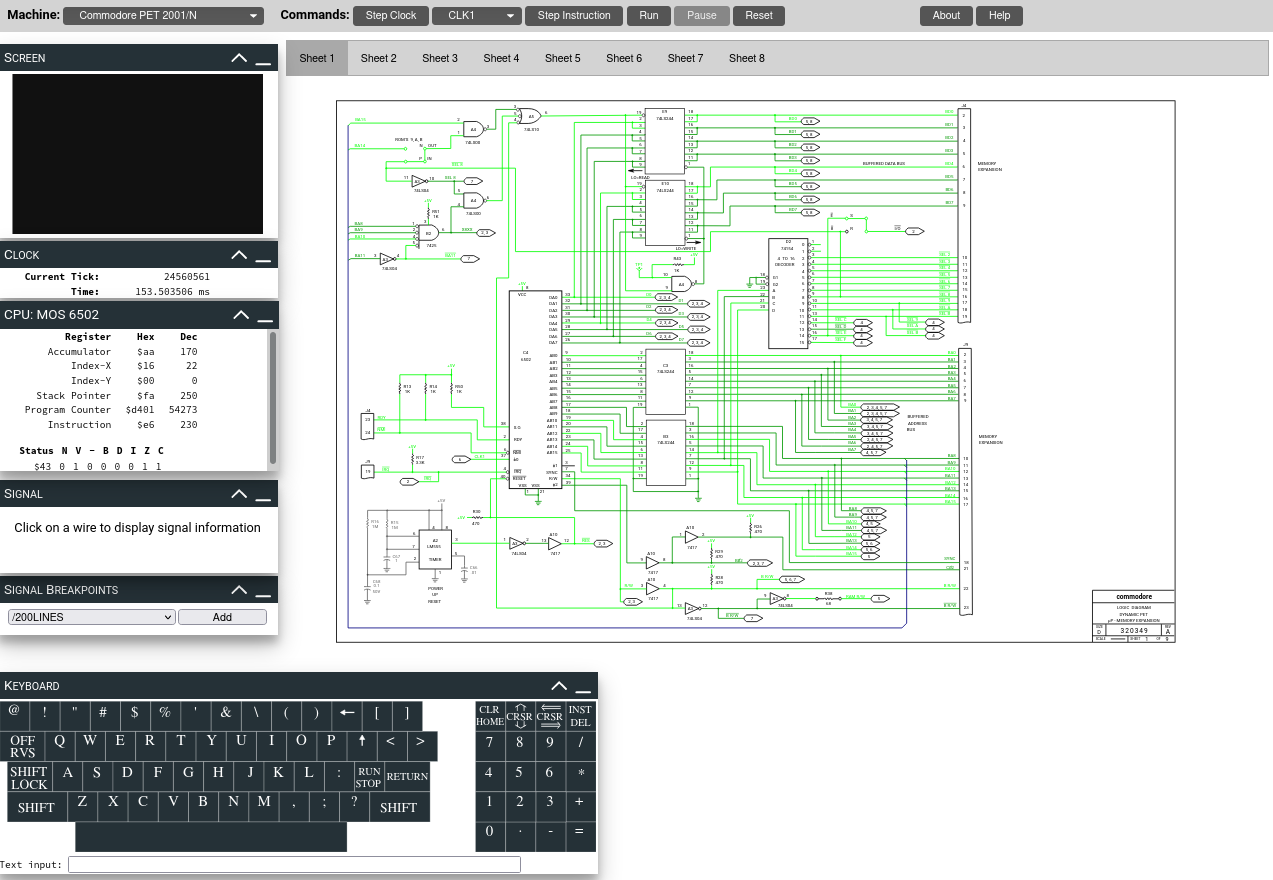
You can play around with a demo of the current version of the schematic viewer. The full GUI-version of dromaius also runs in a browser, and you can try it out here. These should work on any recent browser, tested regularly with Firefox and chromium.
The limitations of the emulator became more apparent as more and more components were emulated. The next blog post in the series will focus on the internals of the emulator and how they’ve evolved over time.